In this article
A pile of granny squares becomes a blanket through matching edges, a deliberate layout and joins that let the fabric lie naturally. The seam is part of the finished textile: it can add a visible line, a ridge, extra width or a different feel on the reverse. Choose it with a small assembled sample before connecting every square you have made.
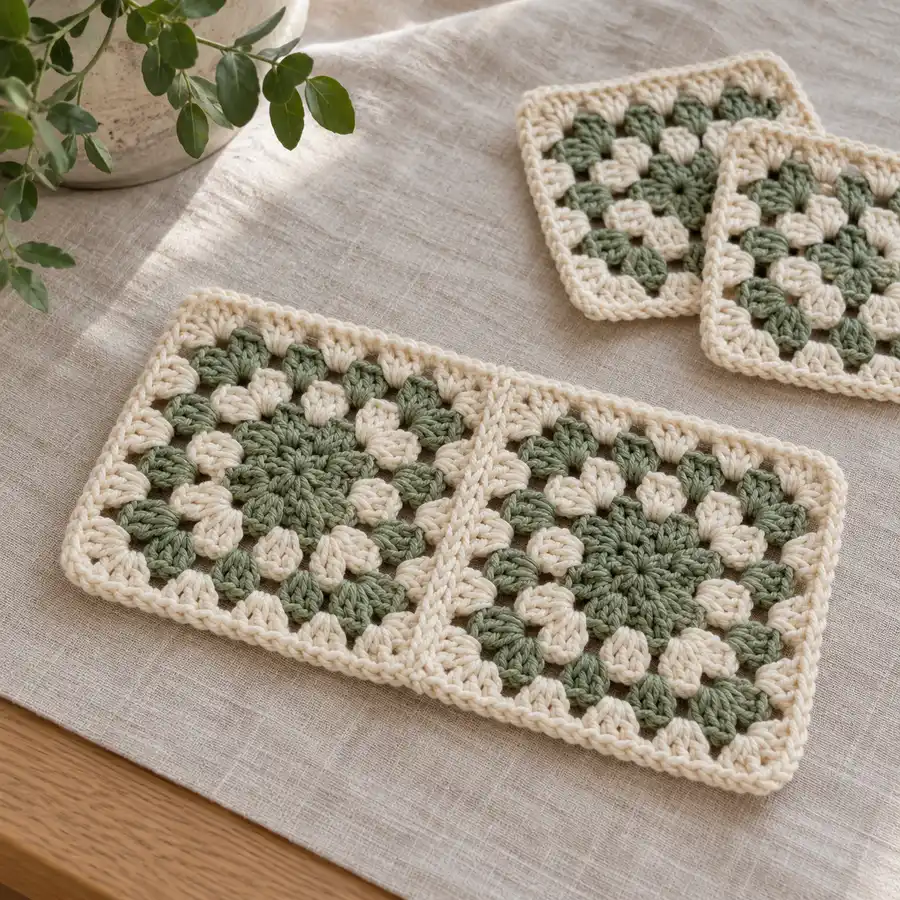
This guide uses a simple sewn practice seam as a starting point, then explains the checks that carry into a complete blanket and border. It uses US stitch names where needed. The selected motif pattern still controls its corner chains, final count and assembly details. The images illustrate separate and joined squares, not counted needle-path diagrams. Keep a clear primary demonstration beside the sample when the motion is unfamiliar.
Make a four-square rehearsal
Choose four squares made from the same supported pattern and finish them consistently. Check the final stitch counts, corner arrangement and relaxed measurements. Use only care or blocking compatible with the yarn. A square with a different count or a damaged corner should be corrected before joining; pulling it to the same outline does not supply the missing structure.
Arrange the squares in the intended order and mark the top of the layout with a removable reference. Take a simple record before stacking them. Have suitable joining yarn, a blunt yarn needle, scissors and stitch markers ready. The joining yarn should be compatible with the project and its care. Reserve enough of it for all seams and the intended finish, rather than spending the supply on more colorful centers first.
Choose the visible line before the whole layout
| Join direction | What to inspect in a sample |
|---|---|
| Sewn whipstitch | Visibility of the joining yarn and natural flexibility |
| Crocheted slip-stitch seam | Ridge, tension and the chosen face of the work |
| US single-crochet seam | More pronounced line and its effect on the fold |
| Join as you go | Connections built into the motif’s final round and layout |
These methods are not interchangeable instructions. Loop selection, orientation and corner treatment change the result. Use the method supplied by the complete blanket design when one is specified. A join-as-you-go project needs its connections planned while the final rounds are being made, so do not finish every motif and assume that method can be added afterward without changing the construction.
For illustrated methods, see Simply Yarn’s square-joining lesson. It uses UK terminology, so its double-crochet join corresponds to US single crochet. The Craft Yarn Council terminology reference helps check that conversion. Yarnspirations also provides a joining demonstration for further visual reference.
Practice one short sewn seam
Match the pair before threading the needle
Place two squares beside each other with the same chosen face upward and align the edges to be joined. Mark the corresponding start, middle and end positions. Identify the actual stitches and corner chains from the motif instructions. Do not assume that every corner space contributes the same number of joining points; the pattern must resolve those boundary placements.
Work through corresponding edge stitches
For a visible whipstitch practice sample, leave a tail for later securing. Pass the threaded needle under both top loops of one edge stitch, then through the corresponding stitch on the other square. Bring the yarn around to the next pair and repeat in the same direction. Keep the squares aligned and the yarn relaxed enough for their edges to rest naturally.
Pause before the seam becomes long
After several pairs, lay the sample flat and inspect both faces. The edges should meet without gathering or stretching. If the seam is drawing in, ease the recent stitches while they are accessible. If the alignment is wrong, remove the affected section and rematch the pair. Continue only after this short connection behaves as intended.
Let a junction test the assembly plan
Join the second pair in the same way, then connect the two short strips according to the blanket design. This creates a small junction where several corners meet. Inspect that crossing from the front and reverse before repeating the method through a larger grid. The junction should not become an unexplained hole or a heavy knot of extra joining yarn.
For the full blanket, follow the design’s seam order and keep the layout record nearby. Work in manageable sections and compare them before adding the next one. A shifted color square is simpler to fix in a short strip than in the middle of a completed assembly. Keep all tails accessible until the neighboring joins and intersections have been checked, then secure them with an appropriate weaving method.
Build the perimeter from the joined blanket
First inspect the new outside edge
Lay the assembled sample or blanket flat and identify its actual outer stitches, corner spaces and seam intersections. Count as the border instructions require. The joins have become part of the object, so the border setup must address their locations rather than treating the outline like an untouched single square. Confirm the final dimensions and leave room for the border’s planned depth.
Then try the foundation round
Use the selected border’s placements and corner recipe. Work a representative side and corner, then set the piece down without pulling it flat. If the new round waves or cups, check the count, distribution and tension before adding another round. Do not use a universal number of stitches in every corner when the motif and border instructions require a different arrangement.
Finish the frame only after it sits naturally
Continue the chosen border once the setup is sound, checking the perimeter after each round. Keep the same spacing and corner treatment on every side. Secure the final ends and use only compatible care or shaping for the materials. A wider decorative border adds dimensions and weight, so it should be part of the blanket plan rather than an attempt to repair unresolved assembly errors.
The small sample is the final checkpoint
The four-square rehearsal should show the motif edges, joining line, central junction and a piece of the border. Keep it with the layout and material notes while making the larger blanket. If any part is uncomfortable or uneven, adjust the method on that small object first. That is a more useful decision point than discovering the same issue in every seam of a finished throw.
Return to the blanket planning guide for overall layout, compare the border collection for a suitable frame and use the fastening and weaving guide for the remaining tails. Scrap-yarn layouts add color choices once compatible squares and joins are established.
- 27 Scrap-Yarn Crochet Blanket Ideas for Leftover Yarn
Plan 27 scrap-yarn crochet blanket layouts, from motifs to stripes and panels, with practical checks for compatibility, usable lengths, joins and borders.
- 23 Textured Crochet Blanket Ideas with Raised Stitches
Compare 23 raised-texture crochet blanket ideas, from ribs and waffles to cables and motifs, with useful checks for weight, reverse sides and joins.
- 15 Striped Crochet Blanket Color Combinations
Explore 15 striped crochet blanket palettes with clear color roles, contrast and stripe-width ideas, plus a practical way to test a repeat before starting.
- 17 Chunky Crochet Throw Ideas for Cozy Bedrooms
Explore 17 chunky crochet throw ideas for a cozy bedroom, from ribbed bed-end accents to patchwork blankets, with practical notes on weight and finishing.
- How to Choose Blanket Yarn, Hook Size and Yardage
Choose blanket yarn and a hook using your pattern and a finished swatch. Learn a practical way to estimate yardage, borders and the number of balls to buy.
- Crochet Blanket Ideas: Style, Size and Skill Guide
Choose a blanket direction by the way it will be used, the construction you enjoy and the material decisions that determine its finished feel.
- 25 Modern Crochet Blanket Ideas for Living Rooms
For restrained pattern, compare the quiet grid and windowpane direction. For bold shape, shortlist the offset blocks. For tactile depth, investigate a ribbed or waffle-style surface.
- 21 Crochet Baby Blanket Ideas for Beginners
For a first rectangular project, compare the plain keepsake and broad bands. For a joining lesson, look at the four-panel direction. Save diagonal construction until you can follow its shaping.
- 19 Granny Square Blanket Layout and Color Ideas
For a first layout, choose an equal straight grid. For a strong colour plan, compare diagonal bands and the centre diamond. For more assembly, examine the mixed-size direction.